Introduction
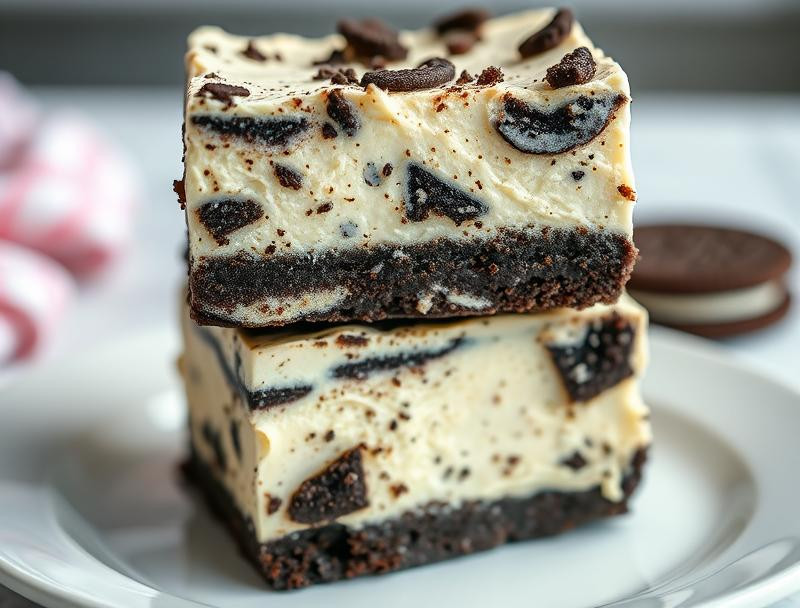
Who needs an oven when you’ve got Oreo cookies and cream cheese? This No-Bake Oreo Cheesecake Bars recipe is a total game-changer, transforming simple ingredients into a decadent dessert that’s surprisingly easy to make. Get ready for a flavor explosion that will have everyone asking for seconds (and thirds!). This recipe is perfect for busy weeknights or impressive gatherings – no baking skills required!
Why This Works
This recipe is a winner because it’s ridiculously easy, ridiculously delicious, and ridiculously adaptable! The combination of creamy cheesecake filling and crunchy Oreo crust is a match made in dessert heaven. Plus, it’s no-bake, meaning less time in the kitchen and more time enjoying the delicious results with your loved ones.
Key Ingredients
🍪 2 packages (36) Oreo cookies, finely crushed
🧈 1/2 cup unsalted butter, melted
🧀 1 (8 ounce) package cream cheese, softened
🍯 1/2 cup granulated sugar
🥛 1 teaspoon vanilla extract
🍫 1 cup heavy cream
🍫 1/4 cup semi-sweet chocolate chips
Instructions
1️⃣ Make the crust: In a medium bowl, combine the crushed Oreos and melted butter. Mix until evenly moistened. Press the mixture firmly into the bottom of an 8×8 inch baking pan. This is your foundation for deliciousness!
2️⃣ Whip the cream cheese: In a large bowl, beat the softened cream cheese and granulated sugar until smooth and creamy. Beat in the vanilla extract.
3️⃣ Fold in the whipped cream: In a separate bowl, whip the heavy cream until stiff peaks form. Gently fold the whipped cream into the cream cheese mixture until just combined. Don’t overmix!
4️⃣ Assemble the bars: Pour the cream cheese mixture over the Oreo crust and spread evenly. Sprinkle the semi-sweet chocolate chips over the top.
5️⃣ Chill and serve: Refrigerate for at least 4 hours, or preferably overnight, to allow the cheesecake filling to set completely. Once chilled, cut into bars and serve. Enjoy!
Handy Tips
- Use a food processor to crush the Oreos for a super fine crumb.
- Make sure your cream cheese is softened to room temperature for easy mixing.
- Don’t overbeat the whipped cream, or it might become too thin.
- For an extra touch of elegance, dust the finished bars with powdered sugar before serving.
Heat Control
This recipe is completely no-bake! The key is making sure your ingredients are at the right temperature before combining them. Softened cream cheese is crucial for a smooth, creamy texture.
Crunch Factor
The perfect balance of textures is what makes these bars so amazing. The crunchy Oreo crust provides a delightful contrast to the creamy, smooth cheesecake filling. The chocolate chips add another layer of textural enjoyment!
Pro Kitchen Tricks
- For a richer flavor, use dark brown sugar instead of granulated sugar.
- Add a pinch of salt to the cream cheese mixture to enhance the sweetness.
- For a fun twist, use different flavored Oreos, like mint or peanut butter.
Storage Tips
Store leftover bars in an airtight container in the refrigerator for up to 3 days.
Gift Packaging Ideas
These bars are perfect for gifting! Package them individually in cellophane bags tied with ribbons, or arrange them in a pretty tin. A handwritten tag with a personal message adds a special touch.
Flavor Variations
🌟 Peanut Butter Swirl: Add 1/2 cup of creamy peanut butter to the cream cheese mixture for a delicious peanut butter cheesecake twist.
🌟 Chocolate Covered: Dip the edges of the chilled bars in melted dark chocolate for an extra decadent touch.
🌟 Berry Bliss: Top the cheesecake filling with fresh berries before chilling for a burst of fruity freshness.
🌟 Mint Chocolate Chip: Use mint Oreos and add Andes mint chocolate chips for a refreshing twist.
Troubleshooting
- Crust too crumbly: If your crust is too crumbly, add a little more melted butter.
- Filling too thin: If your filling is too thin, whip the heavy cream for a longer time to achieve stiffer peaks.
- Bars not setting: Make sure you refrigerate the bars for at least 4 hours, or preferably overnight, to allow the filling to set properly.
FAQ
- Can I use different cookies? While Oreos are classic, you can experiment with other chocolate sandwich cookies.
- Can I make these ahead of time? Yes! In fact, the flavor improves after chilling overnight.
- Are these bars freezer-friendly? Yes, you can freeze them for up to 2 months. Thaw overnight in the refrigerator before serving.
- How many bars does this recipe make? This recipe makes approximately 16 bars.
Conclusion
These No-Bake Oreo Cheesecake Bars are a guaranteed crowd-pleaser! They’re easy to make, incredibly delicious, and perfect for any occasion. So gather your ingredients, get baking (or rather, not baking!), and get ready to impress your family and friends. Don’t forget to share your creations and tag us on social media – we can’t wait to see your delicious results!
OMG! No-Bake Oreo Cheesecake Bars (Easy!)
Delicious, creamy, and easy-to-make Oreo cheesecake bars that require no baking. Perfect for any occasion!
Ingredients
- 24 Oreo cookies, crushed
- 1/2 cup unsalted butter, melted
- 2 (8 oz) packages cream cheese, softened
- 1/2 cup granulated sugar
- 1 teaspoon vanilla extract
- 1 cup whipped cream
- 10 Oreo cookies, chopped for filling
- Extra Oreo cookies for topping
Instructions
- In a mixing bowl, combine crushed Oreo cookies and melted butter. Press the mixture firmly into the bottom of a 9x9 inch baking dish to form the crust.
- In another bowl, beat the softened cream cheese until smooth. Add sugar and vanilla extract, mixing until well combined.
- Fold in the whipped cream gently until the mixture is smooth and fluffy. Stir in the chopped Oreo cookies.
- Spread the cheesecake mixture evenly over the crust in the baking dish. Smooth the top with a spatula.
- Crush some extra Oreo cookies and sprinkle them on top of the cheesecake layer.
- Refrigerate for at least 1 hour to allow the bars to set before cutting into squares and serving.
Tips
- For easier cutting, let the bars chill in the fridge for a longer time.
- You can use a food processor to crush the Oreo cookies quickly.