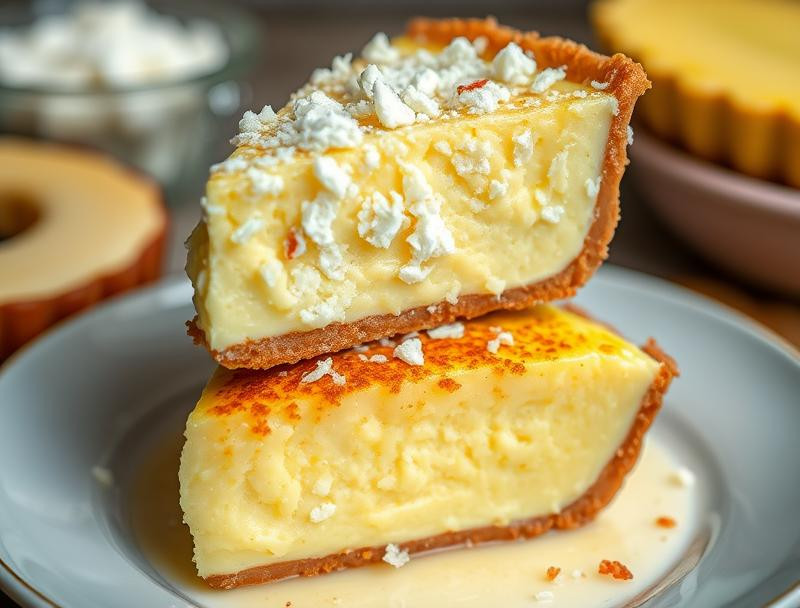
Introduction
Transform simple pantry staples into a slice of paradise with this Coconut Magic Custard Pie! It’s the perfect blend of creamy, dreamy custard and the irresistible toasty flavor of coconut, all nestled in a flaky, buttery crust. This recipe is easier than you think, promising a wow-factor dessert that’ll be the star of any family gathering or weeknight treat. Get ready to impress!
Why This Works
This recipe works because it’s a beautiful balance of textures and flavors. The creamy coconut custard is rich and satisfying, perfectly complemented by the crisp, buttery crust. It’s also incredibly easy to make, requiring minimal baking skills and readily available ingredients. This is a recipe that’s both impressive and approachable – perfect for bakers of all levels!
Key Ingredients
- 🥥 1 (14-ounce) can full-fat coconut milk
- 🥚 3 large eggs
- 🥛 1 cup whole milk
- 砂糖 1 cup granulated sugar
- 🥚 1 large egg yolk
- 🥥 1 teaspoon vanilla extract
- 1 (9-inch) unbaked pie crust
Instructions
1️⃣ Preheat your oven to 350°F (175°C). Place the unbaked pie crust in a 9-inch pie plate.
2️⃣ In a large bowl, whisk together the coconut milk, eggs, milk, sugar, egg yolk, and vanilla extract until well combined and smooth. Make sure there are no lumps!
3️⃣ Carefully pour the custard mixture into the prepared pie crust.
4️⃣ Place the pie plate in a larger baking pan. Pour enough hot water into the larger pan to come about halfway up the sides of the pie plate (this creates a water bath which helps prevent cracking).
5️⃣ Bake for 50-60 minutes, or until the custard is set and just slightly jiggly in the center. The edges should be nicely golden brown.
6️⃣ Remove the pie from the oven and let it cool completely on a wire rack. This will help prevent it from becoming runny.
7️⃣ Once completely cool, refrigerate for at least 2 hours before serving to allow the flavors to meld and the custard to set fully.
Handy Tips
- Use full-fat coconut milk for the richest and creamiest custard.
- Don’t overbake the pie! A slightly jiggly center is normal and will set as it cools.
- For an even crispier crust, pre-bake it for 10 minutes before adding the custard.
Heat Control
The water bath in step 5 is crucial for gentle, even baking. It prevents the custard from curdling or burning on the bottom, ensuring a smooth, creamy texture throughout. Maintaining a consistent 350°F (175°C) oven temperature is key to achieving the perfect custard consistency.
Crunch Factor
The contrast between the creamy coconut custard and the flaky, buttery pie crust provides a delightful textural experience. The crust adds a lovely crunch that balances the richness of the filling.
Pro Kitchen Tricks
- For a shortcut, use a store-bought pie crust.
- Add a pinch of salt to enhance the sweetness of the custard.
- Sprinkle toasted coconut flakes on top before baking for extra coconut flavor and visual appeal.
Storage Tips
Store leftover pie in the refrigerator for up to 3 days. Cover tightly with plastic wrap to prevent it from drying out.
Gift Packaging Ideas
This pie makes a wonderful homemade gift! Present it in a pretty pie carrier or box, decorated with a ribbon. A small card with the recipe would be a thoughtful addition.
Flavor Variations
🌟 Tropical Twist: Add 1/2 cup of chopped pineapple or mango to the custard mixture.
🌟 Chocolate Coconut Dream: Stir in 1/4 cup of melted dark chocolate to the custard.
🌟 Spiced Coconut: Add 1/2 teaspoon of ground cinnamon and a pinch of nutmeg to the custard.
🌟 Lime Zest: Incorporate the zest of 1 lime for a bright, refreshing flavor.
Troubleshooting
- Cracked crust: This can happen if the crust is overbaked or if the temperature is too high. Use a water bath to help prevent cracking.
- Runny custard: This usually means the pie wasn’t baked long enough or wasn’t allowed to cool completely. Make sure to bake until set and chill thoroughly.
- Lumpy custard: Whisk the ingredients vigorously to ensure a smooth mixture.
FAQ
- Can I use a different type of milk? Whole milk is recommended for the creamiest texture, but you can experiment with 2% milk or even half-and-half.
- Can I make this pie ahead of time? Yes, it’s best to make it a day or two in advance to allow the flavors to develop fully.
- What if I don’t have an unbaked pie crust? You can use a pre-made pie crust from the grocery store.
- Can I freeze this pie? Yes, you can freeze the baked and cooled pie for up to 2 months. Thaw it in the refrigerator overnight before serving.
Conclusion
This Coconut Magic Custard Pie is a guaranteed crowd-pleaser! Its simple ingredients and straightforward instructions make it perfect for bakers of all skill levels. We hope you enjoy this heavenly dessert as much as we do. Don’t forget to share your creations on RateMyRecipes.com – we can’t wait to see your beautiful pies!
Crazy Coconut Custard Pie
A delightful pie featuring a creamy coconut custard filling and a flaky crust, perfect for coconut lovers!
Ingredients
- 1 9-inch pie crust
- 1 cup sweetened shredded coconut
- 3 large eggs
- 1 cup sugar
- 1/4 cup cornstarch
- 1/4 teaspoon salt
- 2 cups whole milk
- 1 teaspoon vanilla extract
- 1/2 teaspoon coconut extract
- Whipped cream for topping
Instructions
- Preheat the oven to 350u00b0C (175u00b0F).
- In a bowl, whisk together the eggs, sugar, cornstarch, and salt until smooth.
- In a saucepan, heat the milk over medium heat until it begins to steam, but do not let it boil.
- Slowly pour the hot milk into the egg mixture while whisking constantly to temper the eggs.
- Return the mixture to the saucepan and cook over medium heat, stirring constantly until it thickens.
- Remove from heat and stir in the vanilla extract, coconut extract, and shredded coconut.
- Pour the custard into the prepared pie crust and smooth the top.
- Bake in the preheated oven for 45-50 minutes, or until the custard is set and the top is golden.
- Let the pie cool at room temperature for at least 30 minutes before serving.
- Top with whipped cream before serving.
Tips
- For an extra coconut flavor, use coconut milk instead of whole milk.
- Make sure to let the pie cool completely before slicing for cleaner slices.