Crispy Homemade Chick-Fil-A Chicken Sandwich Recipe
Introduction
Are you craving the unmistakable taste of Chick-Fil-A’s iconic chicken sandwich? Look no further! With this crispy homemade Chick-Fil-A chicken sandwich recipe, you can enjoy the flavors you love from the comfort of your own kitchen. Using everyday ingredients and a few clever tricks, you’ll be able to replicate the signature taste and crunch of this beloved fast food favorite. The best part? It’s easier than you think! By following this simple recipe, you’ll be able to create a mouthwatering chicken sandwich that’s sure to impress friends and family alike. So why wait? Let’s dive in and get started!
Why This Works
- The perfect balance of flavors and textures, combined with the accessibility of the ingredients, makes this recipe a winner. You likely have most of the ingredients in your pantry already!
- The ease of preparation is another significant advantage. With just a few simple steps, you’ll be on your way to creating a delicious homemade version of the Chick-Fil-A chicken sandwich.
- Perhaps most impressively, this recipe delivers impressive results with minimal effort. You don’t have to be a professional chef to achieve restaurant-quality flavor and crunch – just follow the recipe and enjoy!
Ingredients
- 4 boneless, skinless chicken breasts
- 1 cup all-purpose flour
- 2 teaspoons paprika
- 1 teaspoon garlic powder
- 1 teaspoon onion powder
- 1 teaspoon salt
- 1/2 teaspoon black pepper
- 1/4 teaspoon cayenne pepper (optional)
- 2 cups panko breadcrumbs
- 2 tablespoons butter, melted
- 4 soft buns
- Pickles, lettuce, and any other desired toppings
Instructions
- Step 1: Prepare the Chicken – Begin by preparing your chicken breasts. If they’re not already pounded thin, place them between two sheets of plastic wrap and gently pound them to an even thickness. This will help them cook more evenly and prevent them from becoming too thick and unwieldy.
- Step 2: Create the Breading Station – In one shallow dish, mix together the flour, paprika, garlic powder, onion powder, salt, black pepper, and cayenne pepper (if using). In another dish, beat the eggs until they’re well-mixed. In a third dish, place the panko breadcrumbs. This will be your breading station, where you’ll coat each piece of chicken in the flour mixture, then the eggs, and finally the breadcrumbs.
- Step 3: Bread the Chicken – Dip each piece of chicken into the flour mixture, coating both sides evenly. Then, dip the floured chicken into the eggs, making sure they’re fully coated. Finally, place the egg-coated chicken into the panko breadcrumbs, pressing the crumbs gently onto the chicken to ensure they stick. Place the breaded chicken on a plate or tray and refrigerate for at least 30 minutes to allow the breadcrumbs to set.
- Step 4: Fry the Chicken – Heat about 1/2-inch of oil in a large skillet over medium-high heat until it reaches 350°F. Carefully place the breaded chicken into the hot oil and fry for 5-6 minutes on each side, or until the chicken is golden brown and the internal temperature reaches 165°F. Repeat with the remaining chicken breasts.
- Step 5: Assemble the Sandwiches – Once the chicken is cooked, place each breast onto a soft bun. Add your desired toppings, such as pickles, lettuce, and cheese, and drizzle with your favorite sauce. Serve immediately and enjoy!
Handy Tips
- To ensure the breadcrumbs stick to the chicken, make sure the chicken is dry and the breadcrumbs are pressed gently onto the meat.
- If you don’t have panko breadcrumbs, you can substitute with regular breadcrumbs or even crushed crackers.
- To add some extra flavor to your chicken, try marinating it in your favorite seasonings or sauces for at least 30 minutes before breading and frying.
Heat Control
When frying the chicken, it’s essential to maintain the correct temperature to achieve the perfect crispiness. Heat the oil to 350°F and try to keep it between 325°F and 375°F throughout the frying process. If the oil gets too hot, the breadcrumbs will burn before the chicken is fully cooked. On the other hand, if the oil is too cool, the breadcrumbs won’t crisp up properly. Use a thermometer to monitor the temperature and adjust the heat as needed.
Crunch Factor
The crunch factor is what sets this homemade Chick-Fil-A chicken sandwich recipe apart from other recipes. To achieve the perfect crunch, make sure the breadcrumbs are pressed gently onto the chicken and the oil is at the correct temperature. You can also try chilling the breaded chicken in the refrigerator for at least 30 minutes before frying to help the breadcrumbs set. This will ensure a crispy exterior and a juicy interior.
Pro Kitchen Tricks
- To prevent the breadcrumbs from falling off the chicken, try dipping the breaded chicken into a little bit of melted butter before frying. This will help the breadcrumbs adhere to the meat.
- For an extra crispy coating, try using a combination of panko breadcrumbs and grated Parmesan cheese. The cheese will add a rich, nutty flavor and help the breadcrumbs brown more evenly.
- To make the recipe more efficient, try breading multiple pieces of chicken at once and frying them in batches. This will help you cook the chicken more quickly and prevent the oil from cooling down too much.
Storage Tips
- To store leftover chicken, place it in an airtight container in the refrigerator for up to 3 days. Reheat the chicken in the oven or microwave until it’s crispy and hot.
- To freeze the chicken, place it in a single layer on a baking sheet and put it in the freezer until frozen solid. Then, transfer the frozen chicken to a freezer-safe bag or container and store for up to 3 months. Reheat the frozen chicken in the oven or microwave until it’s crispy and hot.
- To keep the chicken fresh for a longer period, try storing it in a container with a paper towel to absorb any excess moisture. This will help prevent the chicken from becoming soggy or developing off-flavors.
Gift Packaging Ideas
While this recipe is perfect for a quick and delicious meal, it’s also a great idea for a gift. Consider packaging the chicken sandwiches in a cute container or bag and adding some extra toppings, such as pickles or lettuce. You could also include a side of fries or a salad for a complete meal. If you’re feeling extra creative, try making a DIY Chick-Fil-A sauce to include with the gift. Simply mix together some mayonnaise, ketchup, and relish, and you’re good to go!
Flavor Variations
- Try adding some diced herbs, such as parsley or thyme, to the breadcrumbs for a fresh and flavorful twist.
- For a spicy kick, add some diced jalapenos or red pepper flakes to the breadcrumbs.
- To give the chicken a smoky flavor, try adding some liquid smoke to the marinade or using smoked paprika in the breadcrumb mixture.
Troubleshooting
- If the breadcrumbs are falling off the chicken, try pressing them gently onto the meat or chilling the breaded chicken in the refrigerator for at least 30 minutes before frying.
- If the chicken is not cooking evenly, try adjusting the heat or using a thermometer to monitor the temperature.
- If the chicken is too dry, try marinating it in your favorite seasonings or sauces for at least 30 minutes before breading and frying.
FAQs
- Can I freeze the chicken? Yes, you can freeze the chicken for up to 3 months. Simply place it in a single layer on a baking sheet and put it in the freezer until frozen solid. Then, transfer the frozen chicken to a freezer-safe bag or container and store for up to 3 months. Reheat the frozen chicken in the oven or microwave until it’s crispy and hot.
- Is this recipe gluten-free? No, this recipe is not gluten-free due to the use of all-purpose flour in the breadcrumb mixture. However, you can try substituting the flour with a gluten-free alternative, such as almond flour or coconut flour.
- Can I double the recipe? Yes, you can double the recipe to make more chicken sandwiches. Simply multiply the ingredients and follow the same instructions. Keep in mind that you may need to adjust the cooking time slightly if you’re frying multiple pieces of chicken at once.
Conclusion
And there you have it – a crispy homemade Chick-Fil-A chicken sandwich recipe that’s sure to become a favorite in your household. With its perfect balance of flavors and textures, this recipe is a must-try for anyone who loves the iconic fast food chain. So go ahead, give it a try, and enjoy the delicious taste of Chick-Fil-A from the comfort of your own kitchen. Don’t forget to share your creations with friends and family, and be sure to tag us in any social media posts so we can see your delicious homemade chicken sandwiches!
Crispy Homemade Chick-Fil-A Chicken Sandwich Recipe
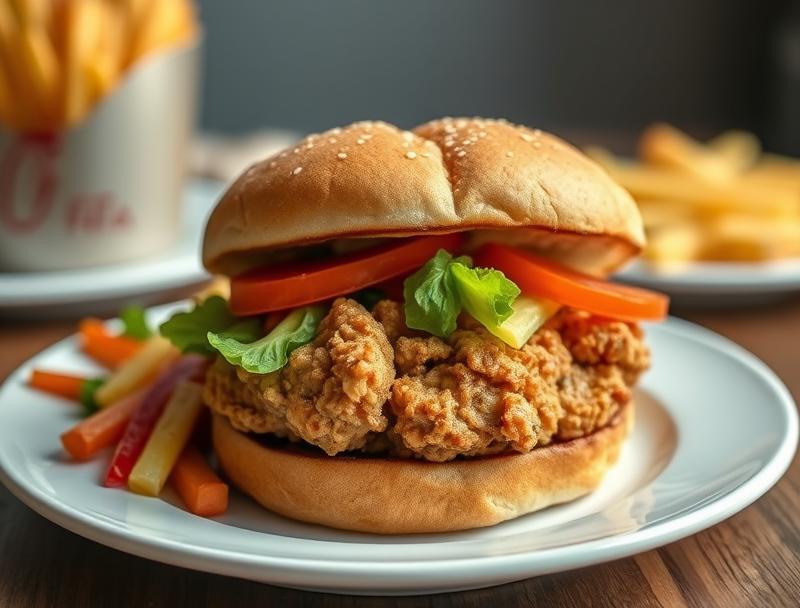
A crispy and delicious homemade version of the iconic Chick-Fil-A chicken sandwich, made with breaded and fried chicken, pickles, and lettuce on a soft bun.
🥘 Ingredients
👩🍳 Instructions
-
1Prepare the chicken by pounding it thin and seasoning with salt and pepper.
-
2Create a breading station with flour, eggs, and panko breadcrumbs.
-
3Bread the chicken by dipping it in the flour, then the eggs, and finally the panko breadcrumbs.
-
4Fry the breaded chicken in hot oil until it's golden brown and crispy.
-
5Assemble the sandwiches by placing the fried chicken on a soft bun and adding desired toppings.