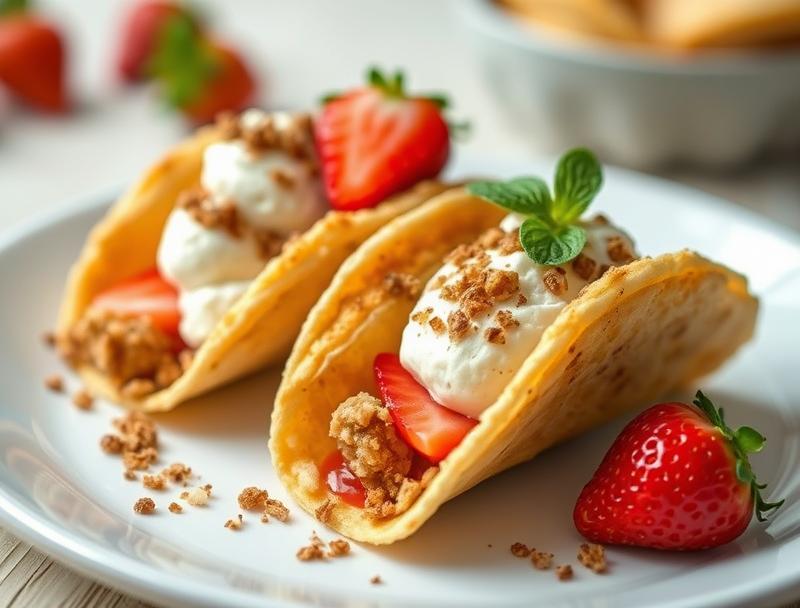
Strawberry Cheesecake Dessert Tacos – Crispy, Creamy & Totally Irresistible! 🍓🌮
Introduction
Imagine a dessert that combines the crunch of a taco shell with the creamy richness of cheesecake and the sweetness of fresh strawberries. This innovative dessert is not only easy to make but also offers a unique twist on traditional desserts. By using everyday ingredients in a creative way, you can impress your friends and family with a dish that is both familiar and excitingly new. The best part? It’s incredibly simple to prepare, making it perfect for any occasion, whether you’re hosting a dinner party or just want a special treat for yourself.
Why This Works
- The balance of flavors between the sweetness of the strawberries, the tanginess of the cheesecake, and the crunch of the taco shell creates a harmonious and intriguing taste experience.
- The ease of preparation is a significant advantage, as it requires minimal cooking and can be assembled quickly, making it perfect for last-minute dessert ideas.
- The impressive presentation and unique concept of dessert tacos make it an ideal choice for special occasions or gatherings, where you want to make a lasting impression with minimal effort.
Ingredients
- 1 package of taco shells (about 12 shells)
- 16 ounces cream cheese, softened
- 1/2 cup granulated sugar
- 1/2 cup sour cream
- 1 teaspoon vanilla extract
- 1 cup sliced strawberries
- 1 cup whipped cream
- Chopped fresh mint leaves for garnish
Instructions
- Step 1: Begin by preparing the cheesecake filling. In a large mixing bowl, beat the softened cream cheese with an electric mixer until smooth. Gradually add the granulated sugar and continue beating until well combined. Then, add the sour cream and vanilla extract, mixing until smooth and creamy.
- Step 2: Prepare the strawberry topping. Wash and slice the strawberries. You can also add a bit of sugar to taste if your strawberries aren’t sweet enough. Set aside.
- Step 3: Assemble the dessert tacos. Hold a taco shell in one hand and spoon some of the cheesecake mixture into the shell. Top the cheesecake with a few slices of strawberry. Repeat this process with the remaining taco shells and filling.
- Step 4: Top each dessert taco with whipped cream and garnish with chopped fresh mint leaves. Serve immediately and enjoy!
Handy Tips
- For an extra crunchy taco shell, you can bake them in the oven at 350°F for about 5 minutes. Keep an eye on them to prevent burning.
- If you find the cheesecake mixture too thick, you can thin it out with a bit more sour cream. Conversely, if it’s too thin, you can refrigerate it for about 10 minutes to firm it up.
- Consider using other types of fruit like blueberries, raspberries, or even bananas to create different flavor variations.
Heat Control
Since this recipe involves minimal cooking, the primary concern is the baking of the taco shells if you choose to crisp them up in the oven. Ensure your oven is preheated to the correct temperature (350°F), and keep a close eye on the shells to avoid overcooking. Ideally, they should be lightly browned and crispy. If you’re not baking the shells, you can skip this step altogether.
Crunch Factor
Achieving the right crunch factor in your dessert tacos is crucial. The taco shells provide the primary crunch, but you can enhance this by toasting them lightly in the oven or in a dry pan. Additionally, using fresh and firm strawberries will add a nice texture contrast to the soft cheesecake and crunchy shell.
Pro Kitchen Tricks
- To ensure your whipped cream stays firm and doesn’t weep, make sure to chill your bowl and beaters in the freezer for about 10 minutes before whipping. Also, don’t over-beat the cream, as it can quickly become too stiff and separate.
- For a cleaner assembly process, consider piping the cheesecake mixture into the taco shells using a piping bag or a ziplock bag with a corner cut off. This can help prevent mess and make the process more efficient.
Storage Tips
- Assembled dessert tacos are best served immediately to preserve the crunch of the taco shell and the freshness of the whipped cream. However, you can prepare the cheesecake mixture and strawberry topping ahead of time and store them in separate containers in the refrigerator for up to a day.
- If you have leftover dessert tacos, it’s best to store the components separately. The taco shells can become soggy if stored with the filling, so it’s better to assemble just before serving.
Gift Packaging Ideas
If you’re considering gifting these dessert tacos, presentation is key. You can package the taco shells, cheesecake mixture, and strawberry topping separately in decorative containers or bags. Include a small card with assembly instructions and suggest serving immediately for the best experience. For a more personalized touch, you could arrange a few assembled dessert tacos in a gift box lined with colorful tissue paper or a small basket filled with fresh mint leaves.
Flavor Variations
- Experiment with different spices in your cheesecake mixture, such as a pinch of cinnamon or nutmeg, to give it a unique twist.
- Consider creative toppings like caramel sauce, chopped nuts, or even candy pieces to add more texture and flavor contrast.
- Ingredient swaps like using different types of cheese or substituting the sour cream with Greek yogurt can also alter the flavor profile of your dessert tacos.
Troubleshooting
- If your cheesecake mixture is too runny, refrigerate it for a bit to firm it up. If it’s too thick, you can thin it out with a bit more sour cream.
- If you find that your taco shells become too crispy or burnt, reduce the baking time or temperature. It’s better to err on the side of undercooking slightly, as they will continue to crisp up a bit after being removed from the oven.
- For over/undercooking signs, keep an eye on the color and texture of your taco shells. They should be lightly browned and crispy, not dark brown or burnt.
FAQs
- Can I freeze it? While you can freeze the cheesecake mixture and the strawberry topping separately, it’s not recommended to freeze assembled dessert tacos due to the texture changes in the taco shells and whipped cream.
- Is it gluten-free? Depending on the brand of taco shells you use, this dessert could be gluten-free. Ensure you choose gluten-free taco shells to make the dessert accessible to those with gluten intolerance.
- Can I double the recipe? Yes, you can easily double or triple the recipe for larger gatherings. Just keep in mind that you’ll need more taco shells, cheesecake mixture, and toppings accordingly.
Conclusion
Strawberry Cheesecake Dessert Tacos are a game-changer for anyone looking to impress with a unique dessert that’s both easy to make and visually stunning. With its perfect balance of crunch, cream, and sweet flavors, this dessert is sure to be a hit at any gathering. Feel free to experiment with different flavors and toppings to make it your own, and don’t hesitate to reach out if you have any questions or need further substitutions or variations. Happy cooking, and enjoy the delightful experience of dessert tacos!
Strawberry Cheesecake Dessert Tacos – Crispy, Creamy & Totally Irresistible! 🍓🌮
A unique dessert combining crunchy taco shells with creamy cheesecake and sweet strawberries, perfect for special occasions or a quick dessert fix.
🥘 Ingredients
👩🍳 Instructions
-
1Prepare the cheesecake filling by beating the cream cheese, granulated sugar, sour cream, and vanilla extract until smooth.
-
2Prepare the strawberry topping by washing and slicing the strawberries.
-
3Assemble the dessert tacos by filling the taco shells with the cheesecake mixture, topping with strawberries, and finishing with whipped cream.
-
4Serve immediately and enjoy!