Introduction
Transform humble chicken breasts into a culinary masterpiece with these incredible Japanese Katsu Bowls! This recipe is surprisingly quick, incredibly easy, and bursting with flavor. Get ready to elevate your weeknight dinner routine with minimal effort and maximum deliciousness. It’s the perfect blend of crispy, savory, and sweet, all nestled in a comforting bowl.
Why This Works
This recipe shines because of its perfect balance of textures and flavors. The crispy, golden-brown katsu contrasts beautifully with the tender chicken, fluffy rice, and tangy tonkatsu sauce. It’s incredibly accessible, using readily available ingredients, and the impressive presentation belies its simplicity. It’s a guaranteed crowd-pleaser!
Key Ingredients
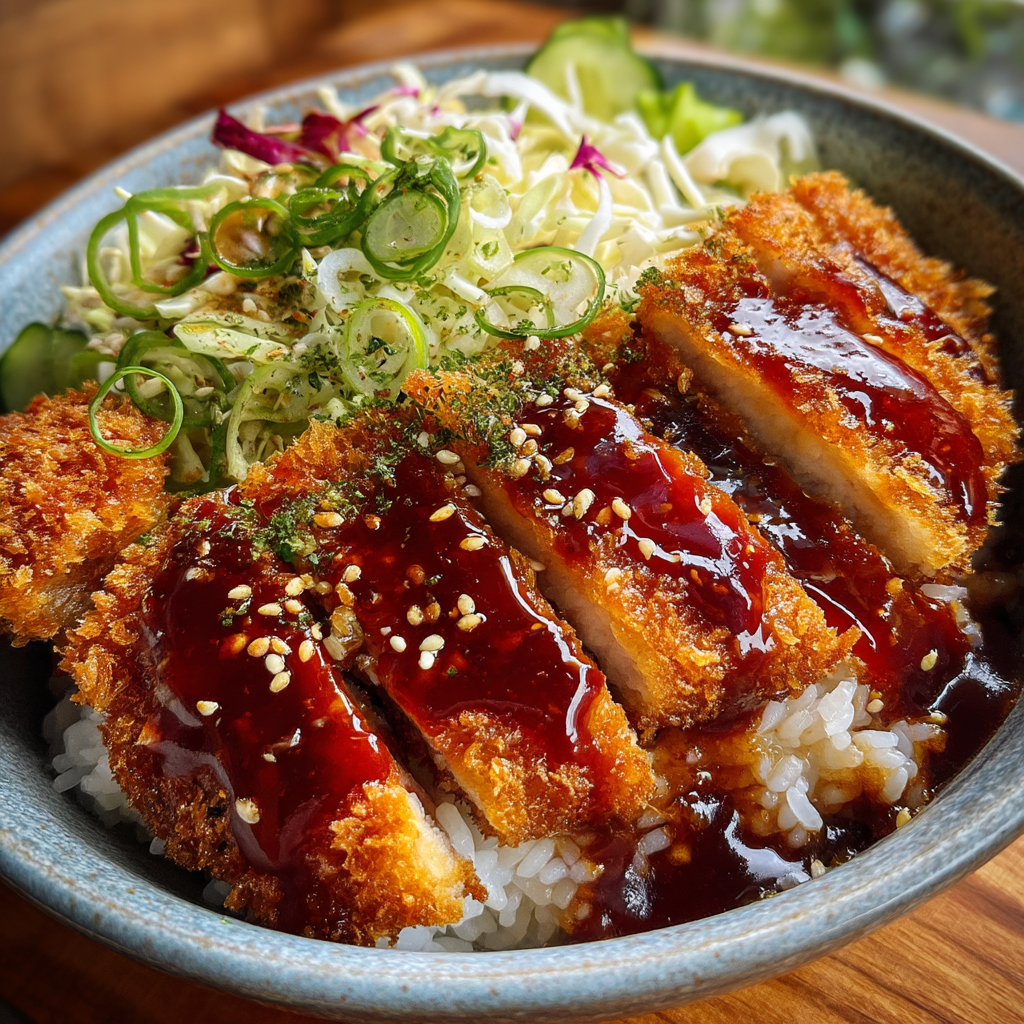
🍗 4 boneless, skinless chicken breasts
🍚 4 cups cooked Japanese short-grain rice
🥬 1 head of shredded cabbage
🧅 1 large onion, thinly sliced
🧄 2 cloves garlic, minced
🥚 2 large eggs, beaten
🍞 1 cup panko bread crumbs
🧂 1 teaspoon salt
🌶️ 1/2 teaspoon black pepper
🍶 1/4 cup soy sauce
🍯 2 tablespoons honey
🍅 1 tablespoon ketchup
🍎 1 tablespoon rice vinegar
Instructions
1️⃣ Prepare the Chicken: Pound chicken breasts to 1/2-inch thickness. Season generously with salt and pepper.
2️⃣ Bread the Chicken: Dip each chicken breast in the beaten eggs, then dredge thoroughly in panko bread crumbs, ensuring a complete coating.
3️⃣ Cook the Chicken: Heat about 1/2 inch of vegetable oil in a large skillet over medium-high heat. Carefully place chicken breasts in the hot oil and cook for about 4-5 minutes per side, until golden brown and cooked through. Remove and drain on paper towels.
4️⃣ Make the Tonkatsu Sauce: In a small saucepan, whisk together soy sauce, honey, ketchup, and rice vinegar. Bring to a simmer over medium heat, stirring occasionally, until slightly thickened (about 2-3 minutes).
5️⃣ Assemble the Bowls: Divide cooked rice evenly among four bowls. Top with shredded cabbage, sliced onions, and minced garlic.
6️⃣ Slice and Serve: Slice the cooked chicken breasts and arrange them on top of the rice and vegetables. Drizzle generously with tonkatsu sauce. Serve immediately and enjoy!
Handy Tips
- For extra crispy katsu, let the breaded chicken rest for 10-15 minutes before frying. This allows the breading to set.
- If you don’t have panko bread crumbs, you can substitute regular bread crumbs, but the texture won’t be quite as light and airy.
- Don’t overcrowd the pan when frying the chicken; this will lower the oil temperature and result in soggy katsu. Fry in batches if necessary.
Heat Control
Maintaining the right oil temperature is crucial for perfectly crispy katsu. The oil should be hot enough to sizzle immediately when the chicken is added, but not so hot that it burns the breading. A medium-high heat is ideal. You can test the oil temperature by dropping a small piece of breading into the oil; it should sizzle and brown quickly. Visually, the chicken is done when it’s a deep golden brown and cooked through.
Crunch Factor
The crunch in this recipe comes from the panko bread crumbs. Panko’s unique texture creates a wonderfully light and crispy coating. Achieving maximum crunch relies on using enough oil, maintaining the correct frying temperature, and allowing the breaded chicken to rest before frying.
Pro Kitchen Tricks
- Prep ahead: You can bread the chicken the night before and store it in the refrigerator, ready to fry when needed.
- Flavor booster: Add a pinch of sesame seeds to the panko bread crumbs for extra nutty flavor.
- Cleanup hack: Line your baking sheet with parchment paper to make cleanup a breeze.
Storage Tips
Leftover katsu can be stored in an airtight container in the refrigerator for up to 3 days. Reheat gently in a microwave or oven until warmed through. The tonkatsu sauce can be stored separately and reheated as needed.
Gift Packaging Ideas
These Katsu Bowls make a fantastic gift! Package the katsu and sauce separately in attractive containers. You could use individual bento boxes for a cute presentation, or even create a themed gift basket with other Japanese snacks. A personalized label adds a special touch.
Flavor Variations
🌟 Spicy Katsu: Add a pinch of red pepper flakes to the tonkatsu sauce for a spicy kick.
🌟 Garlic Katsu: Add extra minced garlic to the chicken breading for a more intense garlic flavor.
🌟 Curry Katsu: Substitute a mild curry powder for some of the soy sauce in the tonkatsu sauce.
🌟 Teriyaki Katsu: Replace the tonkatsu sauce with your favorite teriyaki sauce.
Troubleshooting
- Soggy Katsu: This usually happens if the oil isn’t hot enough or if the chicken is overcrowded in the pan.
- Burnt Katsu: Reduce the heat if the breading is browning too quickly.
- Dry Katsu: Ensure the chicken is cooked through but not overcooked.
FAQ
- Can I use different types of meat? Yes, you can substitute pork or even tofu for the chicken.
- How do I scale the recipe? Simply multiply the ingredient quantities according to the number of servings you need.
- Is this recipe gluten-free? No, the panko bread crumbs contain gluten. Use gluten-free bread crumbs for a gluten-free version.
- Can I make this ahead of time? You can bread the chicken ahead of time and store it in the refrigerator. The rice and sauce can also be prepared in advance.
Conclusion
These Japanese Katsu Bowls are a delightful culinary adventure, perfect for a weeknight dinner or a special occasion. We encourage you to experiment with different flavor variations and share your creations with friends and family. Enjoy the deliciousness!
Crispy Katsu Bowls
A delicious and comforting Japanese dish featuring crispy breaded meat served over rice with fresh vegetables and savory sauce.
Ingredients
- 4 pieces of chicken breast or pork loin
- 1 cup all-purpose flour
- 2 large eggs, beaten
- 2 cups panko breadcrumbs
- Salt and pepper to taste
- Vegetable oil for frying
- 4 cups cooked rice
- 1 cup shredded cabbage
- 1 carrot, julienned
- 4 green onions, sliced
- Katsu sauce for drizzling
Instructions
- Step 1: Season the chicken or pork with salt and pepper on both sides.
- Step 2: Set up a dredging station with three shallow bowls: one with flour, one with beaten eggs, and one with panko breadcrumbs.
- Step 3: Coat each piece of meat first in flour, then in egg, and finally in panko breadcrumbs, pressing gently to adhere.
- Step 4: Heat vegetable oil in a large skillet over medium heat. Fry the breaded meat for about 4-5 minutes on each side until golden brown and cooked through.
- Step 5: Remove the meat from the skillet and drain on paper towels.
- Step 6: Slice the crispy katsu into strips.
- Step 7: To serve, place cooked rice in bowls, top with sliced katsu, shredded cabbage, carrot, and green onions.
- Step 8: Drizzle with katsu sauce and serve immediately.
Tips
- For extra crunch, double-dip the meat in the egg and breadcrumbs.
- Serve with pickled ginger or a side of miso soup for a complete meal.